Neutral density filters are widely used in Landscape photography. These filters are needed to increase the duration of the exposure: (a) when we don’t want to alter aperture or ISO on our setup and (b) when it isn’t dark enough to achieve the desired exposure time by just changing ISO and/or aperture.
I started using neutral density filters some years ago and at that time the average quality of ND filters wasn’t so high. Today a lot of brands are available and there are some quite good ones.
I often get questions about the best ND filters on the market and since the answer is not that simple I have decided to write this article trying to clarify what I think is important to consider when choosing a Neutral Density filter.
Here are some of the aspects that need to be evaluated especially for Landscape photography:
- Color cast: to increase the duration of exposure, filters needs to be “darkened” and the material used to darken the filters may not be color neutral.
- Vignetting: adding “stuff” (filters, holders, adaptors, etc.) on top of the lens may increase vignetting.
- Ease of use: screw filters may be easier and quicker to mount than square filters systems.
- Sharpness: in case the quality of the filter isn’t good enough, sharpness can be compromised.
- Calibration: some filters do not have a “regular” coat, this may result in a “patched” exposure (this is often an issue for variable neutral density filters).
- Flare: some filters are more prone than others towards flares and unwanted reflections.
- Resistance: filters may fall… some filters are made of resin which may be more resistent than glass in case of a fall.
- Holder: in the case of square filters, some holders are better than others because they can improve few aspects and the final user experience (possibility to use a polarizer, light leaks, stability, etc.)
It isn’t easy to evaluate all these aspects, especially when it’s not possible to test in advance some of the available filters on the market. This is why I decided to perform some tests/analysis on four different Neutral Density filters from three well known brands to be able to compare them on a few aspects that (IMHO) are important in Landscape photography.
DISCLAIMER: even if all tests had been performed in a controlled light environment, I cannot exclude that other variables could have in some way influenced the results. Moreover, all results are only related to the sample of filters tested and cannot be referenced as benchmarks for the same type of filters in the market (same filters type may have been produced from different factories or with different materials over time). Please make sure you understand that the sole goal of the test is to assess the quality of the filters I own.
Neutral Density Filters
The neutral density filters tested in this review are:
- Lee ND 1.8 (Little Stopper) [Square – 6 stops – Glass]
- NiSi ND 1.8 Nano Coating IR [Square – 6 stops – Glass]
- Haida ND 1.8 “100 Series” [Square – 6 stops – Glass]
- Haida ND 1.8 PRO II MC Slim [Screw – 6 stops – Glass]
Tests Performed
Here is a list of the tests/analysis I performed:
- A. Color Cast
- B. Density Calibration
- C. Vignette
Let’s go through each of these aspects and analyze the results.
A. Color Cast
To be able to test color cast I took a series of shots in a “controlled light” environment using a color checker card (I placed the color checker card in the middle of the frame).
The basic settings for the camera to get a properly exposed photo were as follows:
- Canon EOS 6D
- Canon EF 16-35 f/4 IS
- Focal Length: 16mm
- Exposure: 1/60s
- Aperture: f/4
- ISO: 100
I first took a few photos of the set with only the lens (no holder, no filter), to get the appropriate WB (White Balance) of the scene and then I forced that metered WB for all other shots (of the same scene) with filters.
The metered value for WB was 5600K (color picker on neutral gray), so nearly perfect Daylight (I was in a room with controlled lighting conditions).
I then took some other shots just with holder and no filters (to check if the holder was in some way influencing the lighting or colors) and finally with filters (switching one by one) by adjusting the exposure for 6 stops (6 stops was the declared amount of stops for all the filters used).
The settings used for taking all photos with filters were as follows:
- Canon EOS 6D
- Canon EF 16-35 f/4 IS
- Focal Length: 16mm
- Exposure: 1s (1/60s + 6 Stops)
- Aperture: f/4
- ISO: 100
- WB: 5500k (Daylight)
I took at least 3 shots for every combination, just to make sure to avoid outliers, but all shots were almost identical for each set, so this confirms that the light didn’t change during the shooting session.
I finally selected 6 different shots to be compared for color cast:
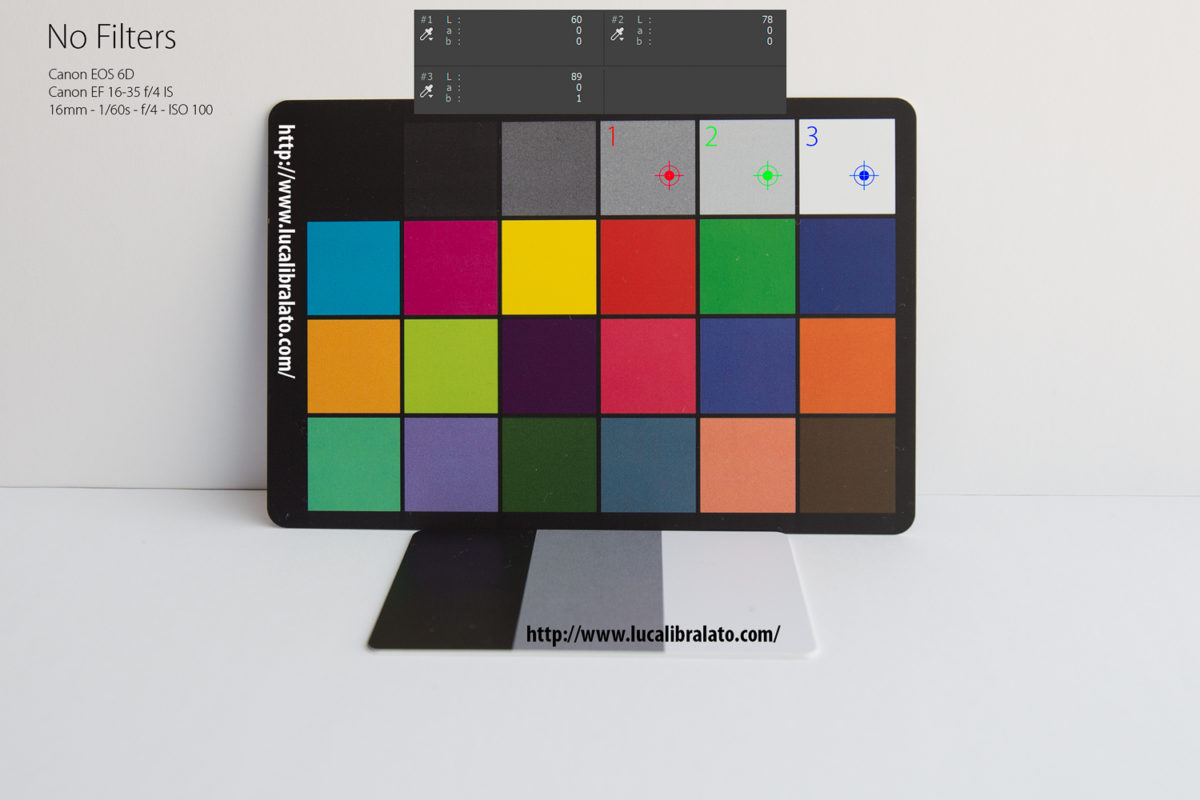
- No Filters (16mm – 1/60 – f/4 – ISO 100)
- Holder With No Filters (16mm – 1/60 – f/4 – ISO 100)
- Lee ND 1.8 (16mm – 1s – f/4 – ISO 100)
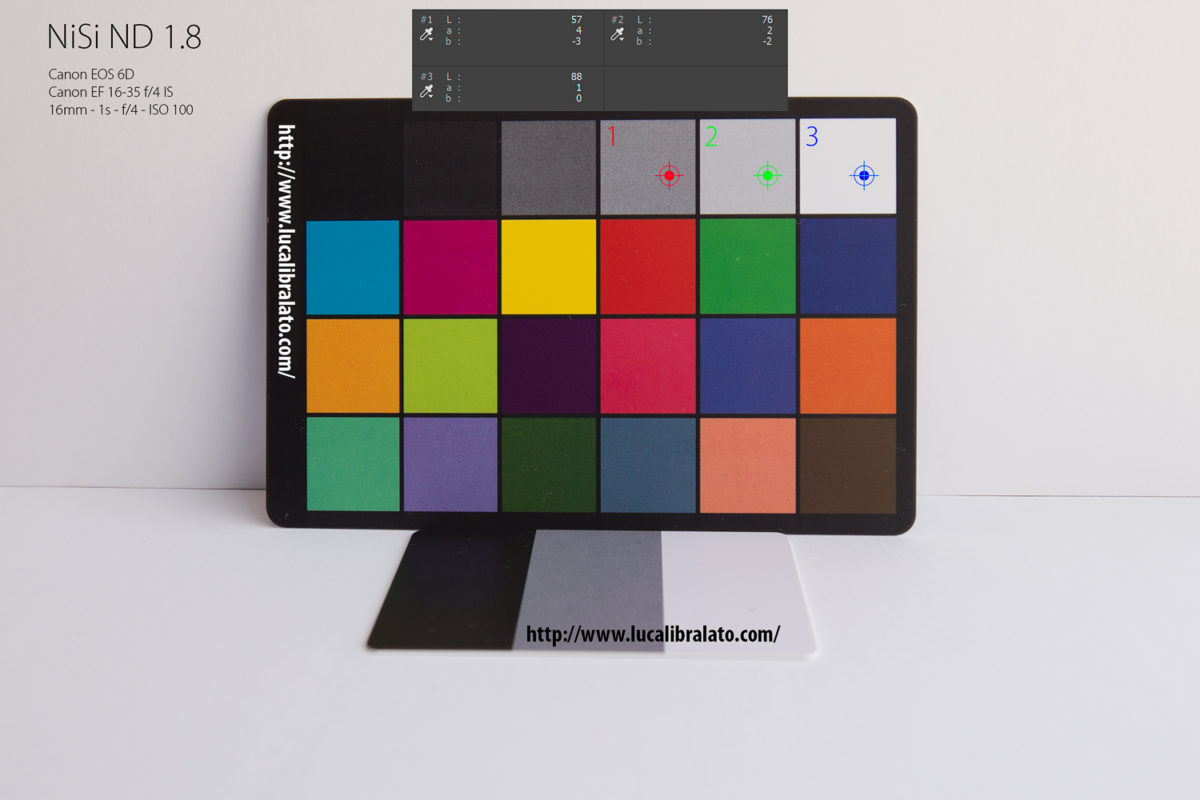
- NiSi ND 1.8 (16mm – 1s – f/4 – ISO 100)
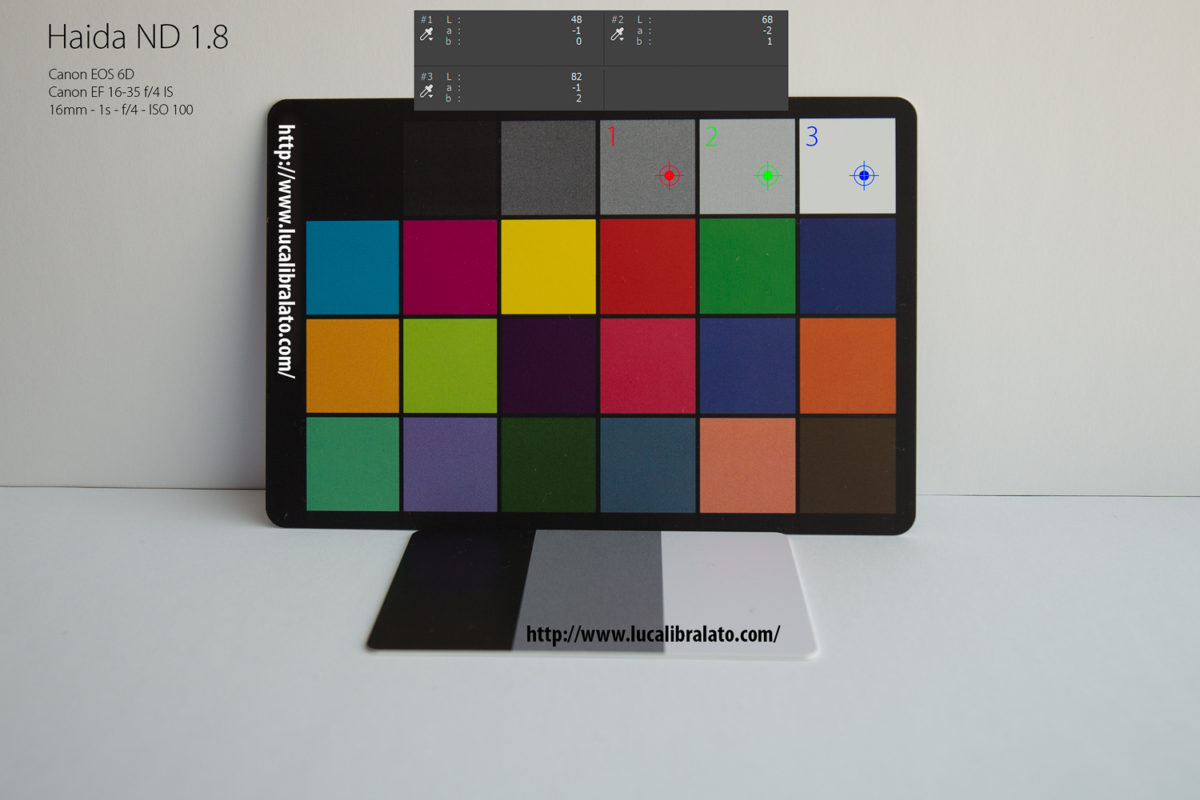
- Haida ND 1.8 (16mm – 1s – f/4 – ISO 100)
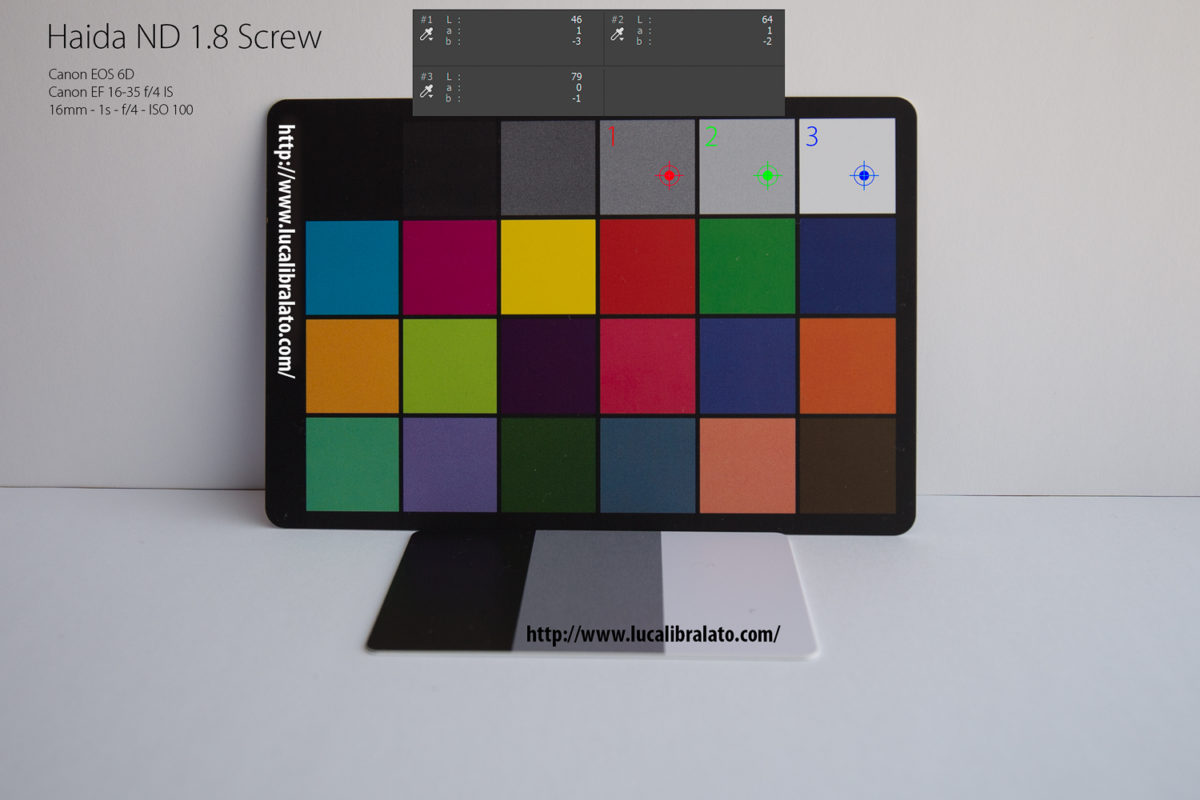
- Haida ND 1.8 Screw (16mm – 1s – f/4 – ISO 100)
I then aligned all six shots in Photoshop (to make sure to pick exactly the same point on the color checker) and added 3 color pickers almost in the middle of the first 3 neutral colors starting from white (averaging 5×5 pixels). I also checked that around the selected pixels color was regular and not changing much. Color pickers were set to Lab measurement, to be able to distinguish color cast just by looking at single component values (a and b): if a and b are equal to ZERO then the color is neutral, while for different values then there is a color cast.
Here are few simple rules that can help in understanding how Lab can measure color cast:
- L: measures Luminance from 0 to 100
- Greater values for L mean brightest colors, while lower values for L mean darker colors
- a: measures color tones from green to magenta/red (from -128 to 127)
- b: measures color tones from blue to yellow (from -128 to 127)
- Negative values for a and b are for cool colors
- Positive values for a and b are for warm colors
So by using Lab color pickers we are able to determine whether there is a color cast on the neutral colors or not when using filters.
Table 1: Color Cast Analysis
Table Caption:
Columns labeled 1, 2, 3: these are the values of the 3 different pickers on the images attached below
Average: the average value of the 3 different pickers
Delta: the delta of each average value compared to the average values from the “No Filters” photo
Absolute Delta: the absolute value of the delta, the greater the number the lesser the performance compared to the “No Filters” photo. To provide a visual highlight of the difference, colors have been used in the cell background: color scale is from green to red, where green is better than red (colors are related to each column “L a b” independently
AWB: this value has been determined by another different shot with Automatic White Balance with filters on, greater absolute differences from the “No Filters” photo AWB means worse performance in terms of color cast
Here are all images captured to determine color cast numbered from 1 to 6.
- No Filters (16mm – 1/60 – f/4 – ISO 100)
All 3 pickers show no color cast (just +1 in the b channel for the brightest neutral color) - Holder With No Filters (16mm – 1/60 – f/4 – ISO 100)
All 3 pickers show no color cast (just -1 in the b channel for the darkest neutral color) - Lee ND 1.8 (16mm – 1s – f/4 – ISO 100)
All 3 pickers show evident color cast on cool colors especially in the blue channel (on average a -4.7 and b -10.3) - NiSi ND 1.8 (16mm – 1s – f/4 – ISO 100)
Light color Cast (on average a 2.3 and b -1.7) - Haida ND 1.8 (16mm – 1s – f/4 – ISO 100)
Light color cast (on average a -1.3 and b 1.0) - Haida ND 1.8 Screw (16mm – 1s – f/4 – ISO 100)
Light color cast (on average a 0.7 and b -2.0)
Images
B. Density Calibration
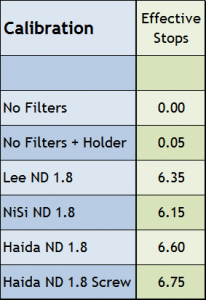
Not all filters are calibrated properly in terms of effective “stops” of light. This aspect impacts on two different points of view: exposure and vignetting. We will investigate vignetting in the following point, while in this step we will consider the effective amount of stops of light subtracted for each of the filters (measured around the center of the frame).
To measure the effective calibration of the filter, I have metered the L value (in Lab color space) for neutral colors in the color checker and I adjusted the exposure in the shots taken with the filter, to match the same L value of the shot without the filter. This method is not perfectly accurate, but it should provide a good indication.
None of the filters tested were perfectly accurate, but NiSi was the one with the better result in terms of calibration, while Haida filters (both screw and square) were the ones with the highest delta in respect of the declared amount of stops (again: keep in mind that the samples tested may vary from other samples produced on different dates, in different factories or using different raw materials).
Table 2: Density Calibration Analysis
C. Vignette
Vignette is another collateral aspect of using neutral density filters and it could be related to incorrect calibration, consistency of the raw materials, thickness and other factors .
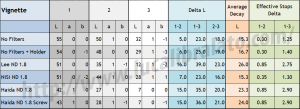
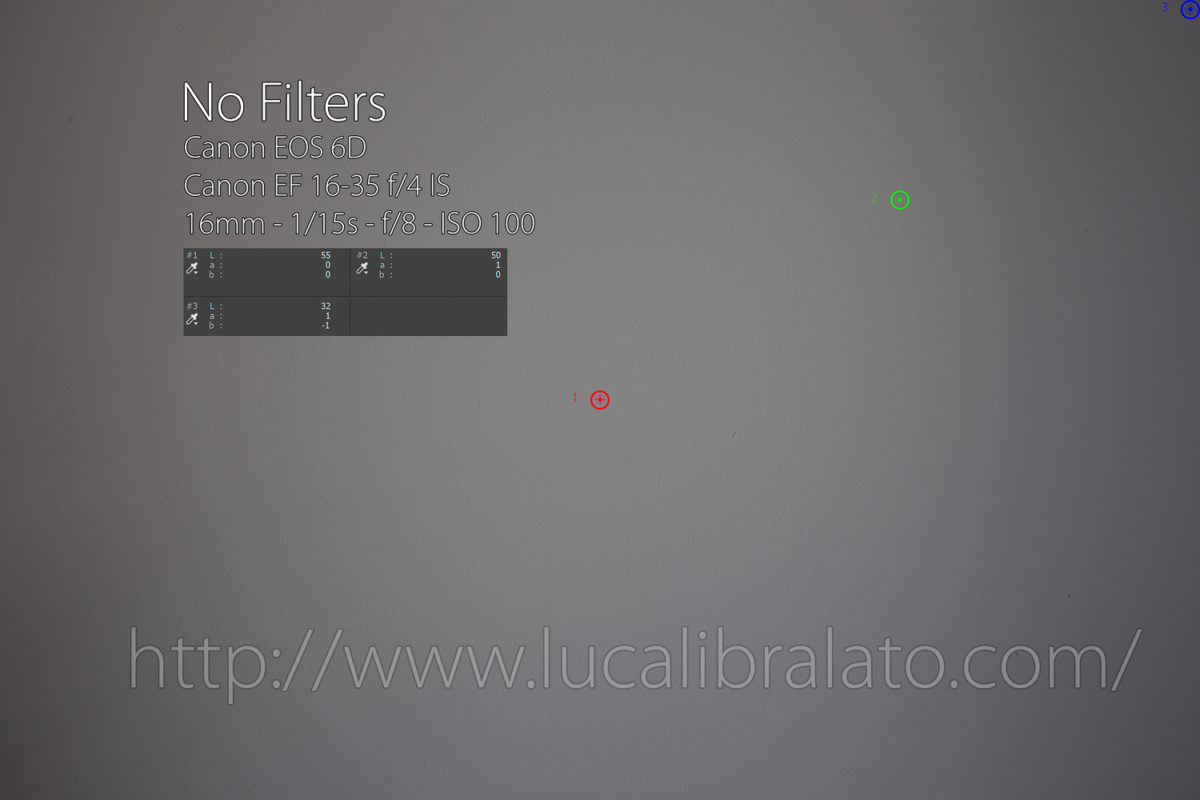
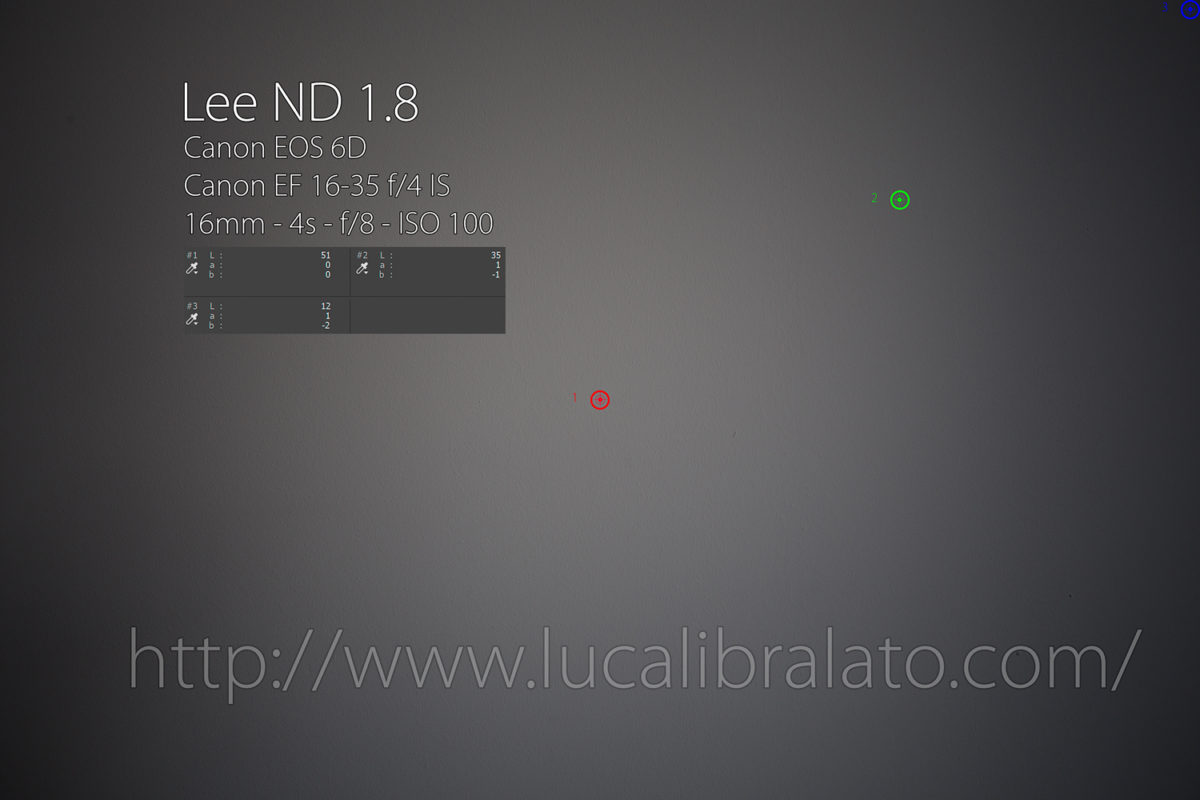
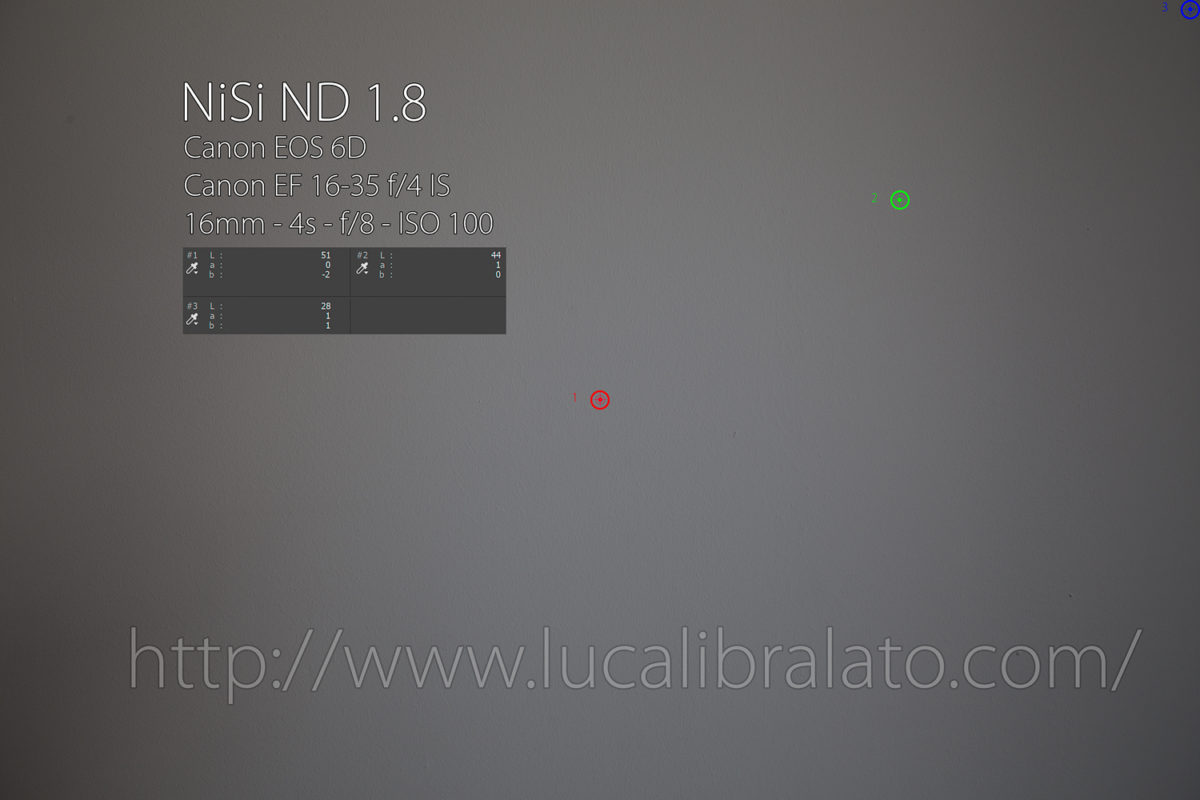
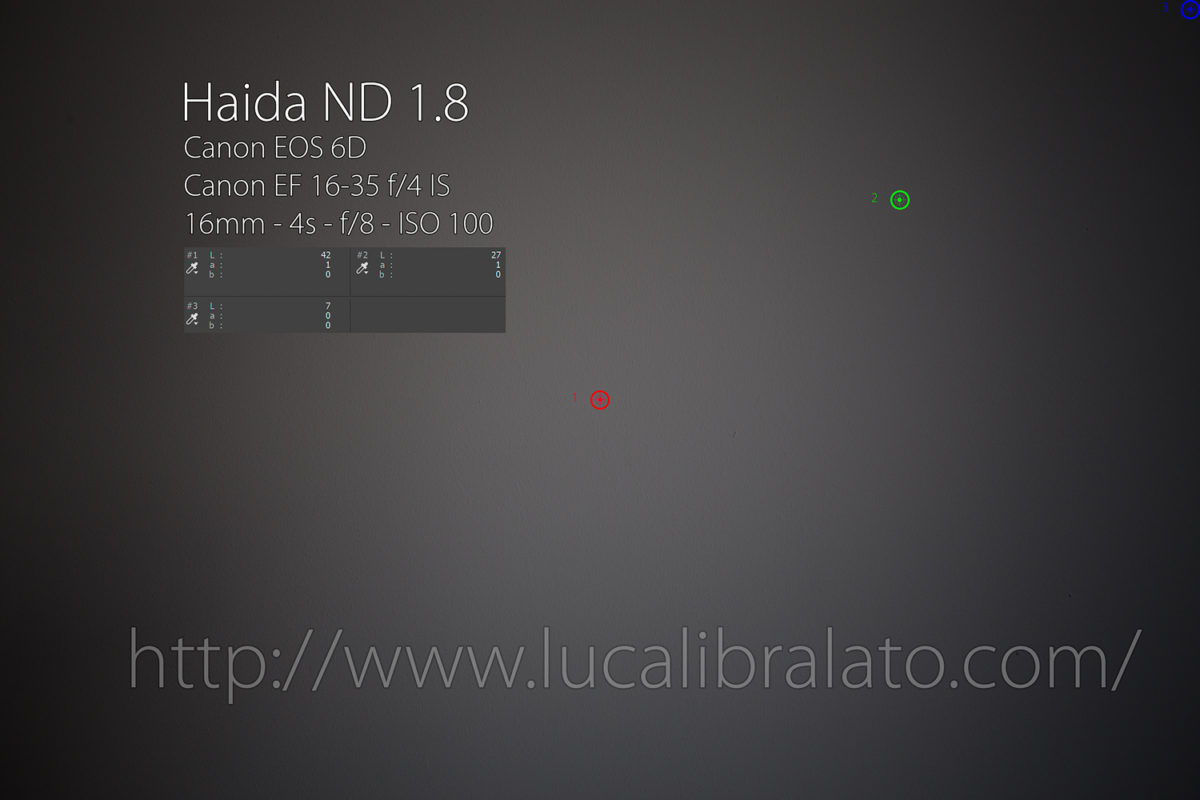
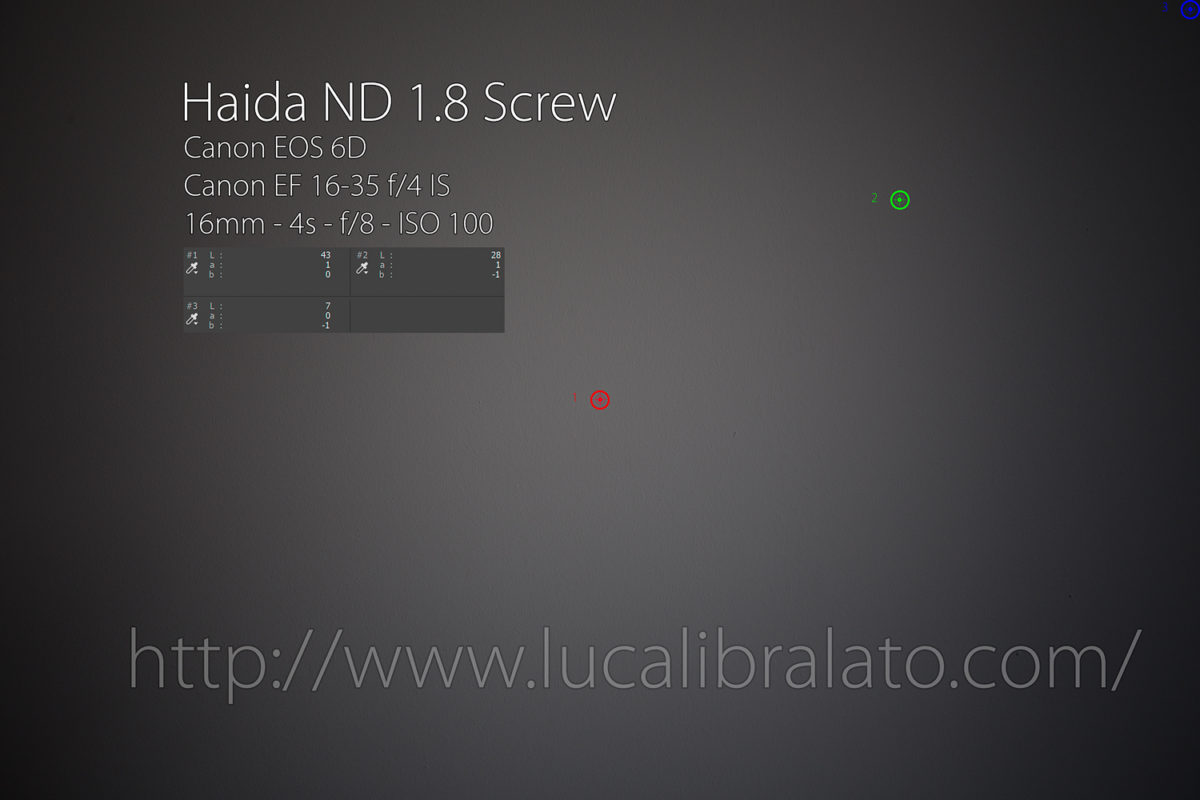
To be able to test vignette, I shot against a neutral wall and I have measured the difference in stops from the center of the frame towards the corner. I took three different points: center, upper right corner and a point in the middle between the previous two.
To make sure the test wasn’t influenced by different holders, I used the same holder for all tests (apart from the screw filter).
In this test, NiSi was the best performer (just 1.3 stops delta, almost identical to lens only vignetting!), while Haida and Lee returned a fairly heavy vignette (almost 3 stops of difference between the center and the corner). I have to mention that Haida results were influenced by the quite heavy calibration (around 6.75 stops, instead of 6) and this could have impacted on the strong vignette on the borders.
Table 3: Vignette Analysis
Table Caption:
Columns labeled 1, 2, 3: these are the values of the 3 different pickers on the images attached below (from center to the top left angle)
Delta L: the delta between each L pairs (1 vs 2, 1 vs 3, 2 vs 3) to measure the change in luminosity between each point in the same photo
Average Decay: the average of the 3 Delta L values, this amount indicates how much light falls (on average) from the center of the frame towards the corner. The greater the number, the greater the decay
Effective Stops Delta: the two columns indicates the difference in terms of stops (measured by Adobe Camera Raw) of the pairs picker #1 vs picker #2 (center of the frame vs intermediate) and picker #1 vs picker #3 (center of the frame vs top left corner)
Here are all images captured to determine color cast numbered from 1 to 6.
Images
Conclusions
After all the tests, we can infer that Haida and NiSi samples were the best performers overall: Haida had slightly better performance on Color Cast (similar absolute results for both square and screw filters), while NiSi had better performance on calibration and vignetting (even though vignetting was likely affected by the “heavy” calibration of the Haida filters).
Just keep in mind the disclaimer at the top of the article: all these tests are valid only for the samples tested and cannot be referred to as a benchmark for all filters on the market.
Should you have any question, you can contact me through the contact form on this website, or you can find me on all major social networks.
Filters brands on Facebook:
Lee Filters on Facebook
NiSi Filters Global on Facebook
Haida Filters on Facebook


